Creating a Ruby GEM
Creating a Ruby Gem with Bundler
Creating a Ruby gem can be an intimidating task. Nonetheless a well worthy goal. I”ll be going over on how to get started creating a ruby gem and the structure of a gem.
Getting Started
Gem File structure
To get a better understanding of a gem’s structure we will go over the methodical structure most gems posses. We will start by creating a gem with bundler, a ruby gem manager. More information on Bundler can be found at the following site. https://bundler.io/Bundler
I created an app called ‘product_review’. The app will scrape a live site and return the scraped information back to the user in a well organize order.
First we need to navigate to the directory where we want our app to reside. Then we simply type the following command :
`bundle gem app_name`
Once the process is completed you should have a structure similar to the following
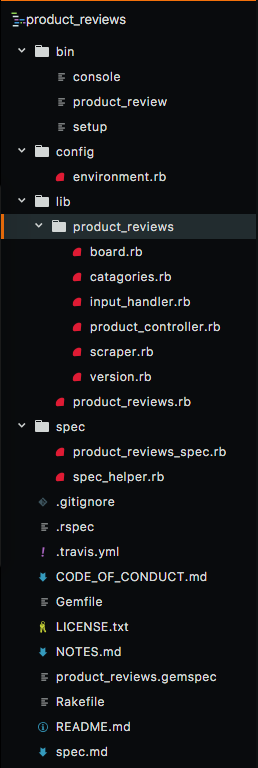
|
Requiring files
The first step in creating this app is requiring the necessary files for your environment. What this means is telling your gem what files it should know about. I place this code in the the lib directory inside the product_review.rb file. This is how the file looks like.
      require "nokogiri"
      require "open-uri"
      require "pry"
      require_relative "../lib/product_reviews/version"
      require_relative "../lib/product_reviews/scraper"
      require_relative "../lib/product_reviews/catagories"
      require_relative "../lib/product_reviews/product_controller"
      require_relative "../lib/product_reviews/board"
ProTip
Always userequire_relativewhen requiring files. Usually the keywordrequireis used when acquiring from the Ruby's standard library.
Once that’s done we could start requiring any other dependencies that our app might require, such as gems that our app depends on to run smoothly. We will specify these gems in our Gemfile. The Gemfile should look something like the following if acquiring gems.
    gem "nokogiri"
    gem "rails", "3.0.0.beta3"
    gem "rack",  ">=1.0"
    gem "thin",  "~>1.1"
More information can be found at https://bundler.io/v1.5/gemfile.html
After we taken care of our gem dependencies we could start writing our code inside the directory with the same name as our gem which is located inside the lib directory.
In my case that would be lib/product_reviews
maintainability is key when writing out your application. I Usually write each class in a separate file with the lib directory inside the the directory with the same name as my app as shown above. I also making sure my environment file is updated accordingly.
ProTip
When using git make sure to commit often and write often.
Once your code is in place and passing its time to setup your executable.
In your bin directory you will find two files Console and setup . These files will play a major part in executing your gem.
bin/console
The console file is used to experiment with your could before releasing it. It allows us to set an experimental environment to test our gem.
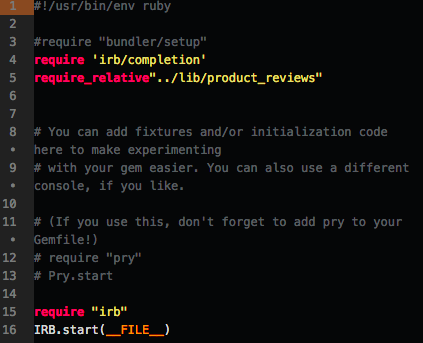
The console file doesn’t require any extension since it will be interacting directly with the terminal. As a result we need to specify exactly where it would find our ruby interpreter, in order to have our code interpret. As show on line 1 on the above picture.
This works because most modern systems have an executable at
#!/usr/bin/env ruby
Which will execute the utility that you pass to it based on your path. Line 3 , 4 and 5 are requiring irb and our environment file. Line 16 starts the IRB session. This simple setup allows us to test code that was written in IRB before deploying it.
First call
When first executing our gem the first file that gets run is located in
bin/product_review
The code looks like this
` #!/usr/bin/env ruby `
require_relative"../config/environment"
ProductReviews::ProductController.new.call
The first line tells the terminal where to search for the ruby interpreter while the second lines loads our ruby environment which contains the path to all our files necessary to run this gem. The third line creates an object and executes the instance method call. Since this object will mostly be responsible for the flow of out program it’s only valid that in most cases it’s refer as controller, hence ProductController.
ProTip
Since we are working directly with the systems CLI it’s only logical to expect the system to protect itself from harm by being discriminant against which files have executable rights. Has a result when initially trying to run
bin/product_reviewyou might get apermission deniederror. This can be easily changed by changing the file permission of the file with the following command
$chmod +x file_name
and
$s –l
To check the file permission.
Some Best Practice to consider
-
Try to write your code as abstract as possible. This will allow for better maintainability and easier to add features in the future.
-
Try to follow the DRY principle. Don’t repeat yourself by reusing code already written.
-
Write a good description for your app.
-
Details on how others can contribute to your app.
-
Link to your app’s license permission
-
Don’t ever give up